Creating an RFP
Now that the demand is approved and the project is created, the next step is to create the RFP. Click "Projects"

Click "View Project"

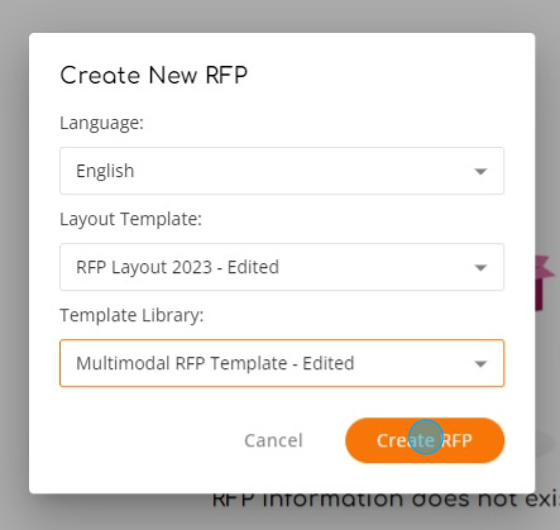
Select the Language, the Layout Template and the Template Library. Click "Create RFP":
The RFP/RFI screen has several tabs:
- Layout
- RFP Team
- Overview
- Background
- Context
- Scope & Deliverables
- Schedule & Budget
- Other Requirements
- Proposal Content
- RFP Process
- Associated Documents
1) Layout
The Layout screen shows your chosen layout:
You can change the information in the layout, but it will only take effect if you save it using the button "Save & Next"
At anytime you can preview the RFP by click the "Preview" and at the end, you can export the RFP by clicking "Export".
The "Clock" icon on the right shows the Export History, where you can see who exported the NDA and when. You can view, download or delete each exported version.
You can also change the layout if you want. Click the "Change Layout" button on the right side of the screen:
Choose a new Layout and click "Change NDA Layout"
A warning pop up is displayed:
The new layout is loaded:
2) RFP Team
The RFP Team tab is where you manage the people that are in the RFP:
To add a new member, click the "Add Team Members" button, select the team member and click "Submit"
The member is added to the list:
If you want to make another team member as the RFP leader, click the "Make Team Leader" button:
The new leader receives the role:
Only the team leader can change the roles of the team. If you want to change the leader to the original person, you have to ask the current team leader to do that. If I log in as Captain America, I can see I can change the role:
To remove a person from the team, the leader needs to click the delete button:
A confirmation pop up is displayed:
The member is removed:
3) Overview
Here you can type the project's overview:
4) Background
Here you can describe the company overview:
By default, leve 2 Overview and Strategic Ambition are disabled, but if you want to add these to your RFP, enable it using the toggle on the right side:
Click "Save & Next"
5) Context
The context tab have the Rationale and Support required (required fields) and What has been done, Key questions and Expected benefits (optional). As explained on the previous section, if you want to use the optional fields, you must activate them by using the toggle:
6) Scope & Deliverables
Here you must add the Objective(s), the Scope and Expected Deliverables (All fields are required.):
7) Schedule & Budget
Here you can enter the Project Expected Start Date, Project Expected End Date, Project Expected Duration and Target Budget. If you want to enter the Project Expected Duration and the Target Budget you must activate the fields first using the toggle:
8) Other Requirements
Here you can set up the language, describe the Team Set-up, the Location and add other information you seem fit. All fields are disabled by default and if you want to use them, you have to activate first using the toggle:
9) Proposal Content
Here you can describe the Expected Proposal Content (required field), References & Expertise and Fees & Workload (Optional and disabled by default):
10) RFP Process
Here you can add the milestones, the Eligibility & Qualifications, Selection Criteria, Q&A, Other Questions and Key Contacts.
To add the milestones, select them from the dropdown list:
Click the " Add" Button and select the dates for each milestone:
If you want to use "Eligibility & Qualifications", enable it using the toggle first.
Select the "Selection Criteria" from the dropdown list:
Click the " Add" Button and enter the weight for each criteria, up to 100:
You can add a new criteria that is not listed on the dropdown, but clicking the "+Add new criteria" button, but you have to rebalance the weight, because the sum must be 100:
You can rearrange the order of the criteria by hovering over it and using the 6 gray dots to drag and drop and change the order:
Q&A and Other Questions are disabled. If you want to use, enable them using the toggle.
Select the key contacts from the dropdown list:
11) Associated Documents
Here you can upload up to 2 documents to the RFP and add up to 2 drive links from any cloud storage platform. Use the "Upload" button to upload a document. Past a drive link on the respective box and click "+Add"
to it to the RFP
Related Articles
Creating the SoW
The next step on "The Project Lifecycle" is the creation of the SoW for the project. Click "SoW/Contract" The "Create SoW" pop up will be displayed. Select the Firm name, Link an MSA with the SoW (Optional), select the language, the layout and the ...Creating Demands
To add a new demand, click on "Demand Management" Click "Demands" Here you can manage the demands: Click "Add Demand" on the top right corner of the screen: The name of the demand and the confidentiality level are the first information requested. ...How does one can view a RFP project?
To view the RFP projects, click "Projects": And click "RFP Projects": You can see all your finished, ongoing, and future RFP projects on this screen: On the list of projects screen, you have: Project ID: ID generate by consource Project Name Businees ...How do I create a Demand or a RFI or a RFP based on a Initiative?
Go to "Pipeline Management": Click "Pipeline" Here you can manage all your initiatives: Find the Initiative you are looking for and click one of the 3 options: 1) Create Demand To create a demand based on a pipeline initiative, click "Create Demand": ...How to delete RFP Projects?
To delete projects, go to projects: Here you can manage all projects: To delete a project, click the trash bin: A confirmation pop up will be displayed. Click "Delete": The project is deleted: Projects without the trash bin cannot be deleted as they ...